How to Scrape a Website into Excel without programming
This web scraping tutorial will teach you visually step by step how to scrape or extract or pull data from websites using import.io(Free Tool) without programming skills into Excel.
Personally, I use web scraping for analysing my competitors’ best-performing blog posts or content such as what blog posts or content received most comments or social media shares.I also scrape best performing competitors’ Facebook posts and Twitter posts.
In this tutorial, We will scrape the following data from a blog:
- All blog posts URLs.
- Authors names for each post.
- Blog posts titles.
- The number of social media shares each post received.
Then we will use the extracted data to determine what are the popular blog posts and their authors, which posts received much engagement from users through social media shares and on page comments.
Let’s get started.
Please note:Web scraping is against the terms of use of some websites.Please read and follow terms of use of the site(s) you wish to scrape to avoid getting yourself into a lawsuit.
Table of Contents
- 1 Step 1: Install import.io app
- 2 Step 2: Choose how to scrape data using import.io extractor
- 3 Step 3: Data scraping process
- 4 Step 4: Training the “columns” or specifying the data we want to scrape
- 5 Step 5: Publishing the API
- 6 Step 6: Extracting data from multiple pages of the blog at once
- 7 Step 7: Getting social statistics of the blog posts
- 8 Step 8: Combining the two excel sheets for further data analysis
- 9 Step 9: Data analysis
- 10 Conclusion
Step 1: Install import.io app
The first step is to install import.io app.A free web scraping tool and one of the best web scraping software.It is available for Windows, Mac and Linux platforms.Import.io offers advanced data extraction features without coding by allowing you to create custom APIs or crawl entire websites.
After installation, you will need to sign up for an account.It is completely free so don’t worry.I will not cover the installation process.Once everything is set correctly, you will see something similar to the window below after your first login.

Step 2: Choose how to scrape data using import.io extractor
With import.io you can do data extraction by creating custom APIs or crawling the entire websites.It comes equipped with different tools for data extraction such as magic, extractor,crawler and connector.
In this tutorial, I will use a tool called “extractor” to create a custom API for our data extraction process.
To get started click the “new” red button on the right top of the page and then click “Start Extractor” button on the pop-up window.
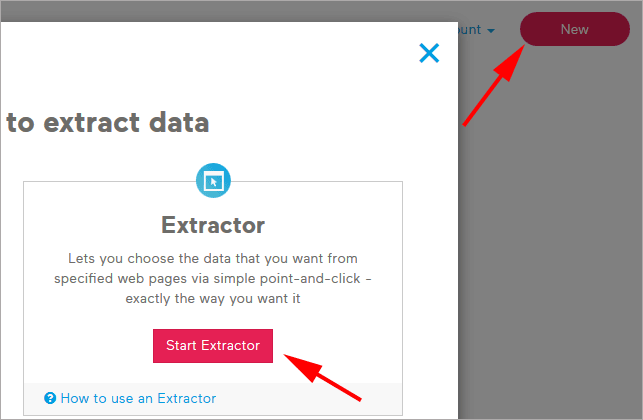
After clicking “Start Extractor” the Import.io app internal browser window will open as shown below.
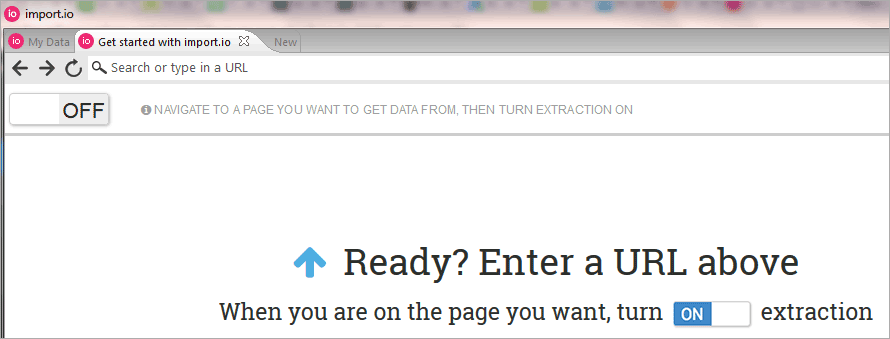
Step 3: Data scraping process
Now after the import.io browser is open navigate to the blog URL you want to scrape data from. Then once you already navigated to the target blog URL turn on extraction.In this tutorial, I will use this blog URL bongo5.com for data extraction.
You can see from the window below I already navigated to www.bongo5.com, ut extraction switch is still off.

Turn extraction switch “ON” as shown in the window below and move to the next step.

Step 4: Training the “columns” or specifying the data we want to scrape
In this step,I will specify exactly what kind of data I want to scrape from the blog.On import.io app specifying the data you want to scrape is referred to as “training the columns”.Columns represent the data set I want to scrape(post titles, authors’ names and posts URLs).
In order to understand this step, you need to know the difference between a blog page and a blog post.A page might have a single post or multiple posts depending on the blog configuration.
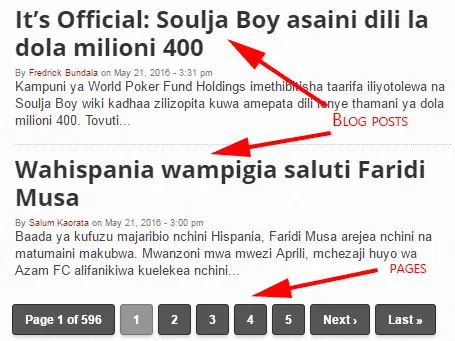
A blog might have several blog posts, even hundreds or thousands of posts.But I will take only one session to train the “extractor” about the data I want to extract.I will do so by using an import.io visual highlighter.Once the data extraction is turned on the-the highlighter will appear by default.
I will do the training session for a single post in a single blog page with multiple posts then the extractor will extract data automatically for the remaining posts on the “same” blog page.
Step 4a:Creating “post_title” column
I will start by renaming “my_column” into the name of the data I want to scrape.Our goal in this tutorial is to scrape the blog posts titles, posts URLs, authors names and get social statistics later so I will create columns for posts titles, posts URLs, authors names.Later on, I will teach you how to get social statistics for the post URLs.
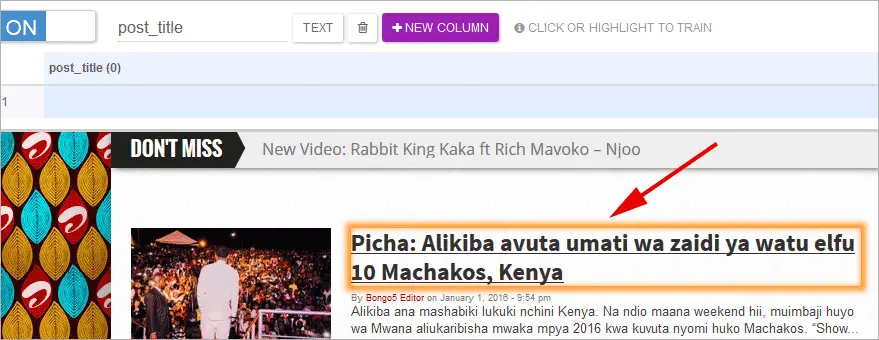
After editing “my_column” into “post_title” then point the mouse cursor over to any of the Posts title on the same blog page and the visual highlighter will automatically appear.Using the highlighter I can select the data I want to extract.
You can see below I selected one of the blog post titles on the page.The rectangular box with orange border is the visual highlighter.
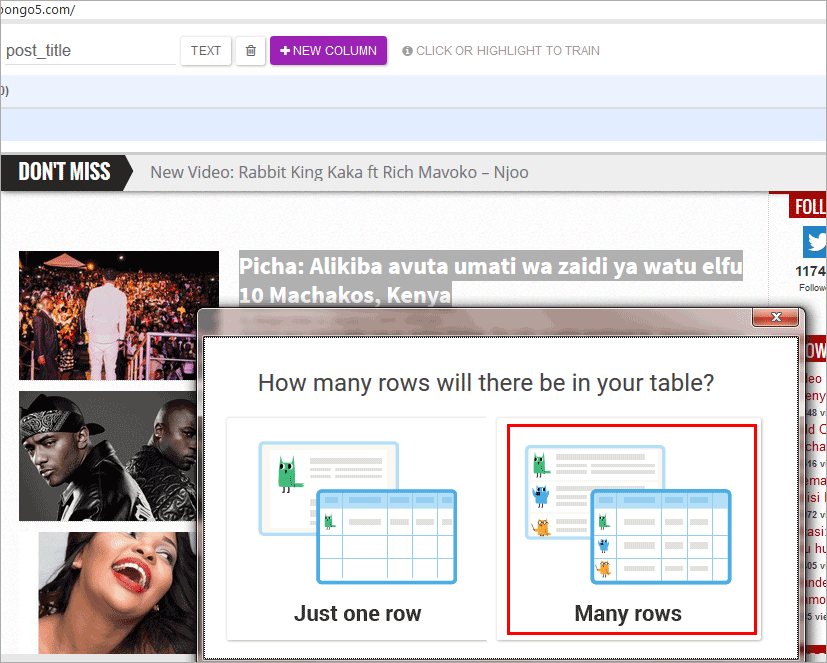
The app will ask you how is the data arranged on the page.Since I have more than one post in a single page then you have rows of repeating data.This blog is having 25 posts per page.So you will select “many rows”.Sometimes you might have a single post on a page for that case you need to select “Just one row”.
The extractor will automatically extract all the titles from that same page and put them into a single column which I renamed earlier as “post_title’.
You need to double check to confirm whether the extractor is getting all the blog post titles on the page.You can see my “post_title” column has picked 25 blog post titles from the page which is similar to the number of posts per page I mentioned earlier.Now I’m sure all of them were extracted.If you are getting less number than the total number of the posts on the page then you need to repeat the process again.
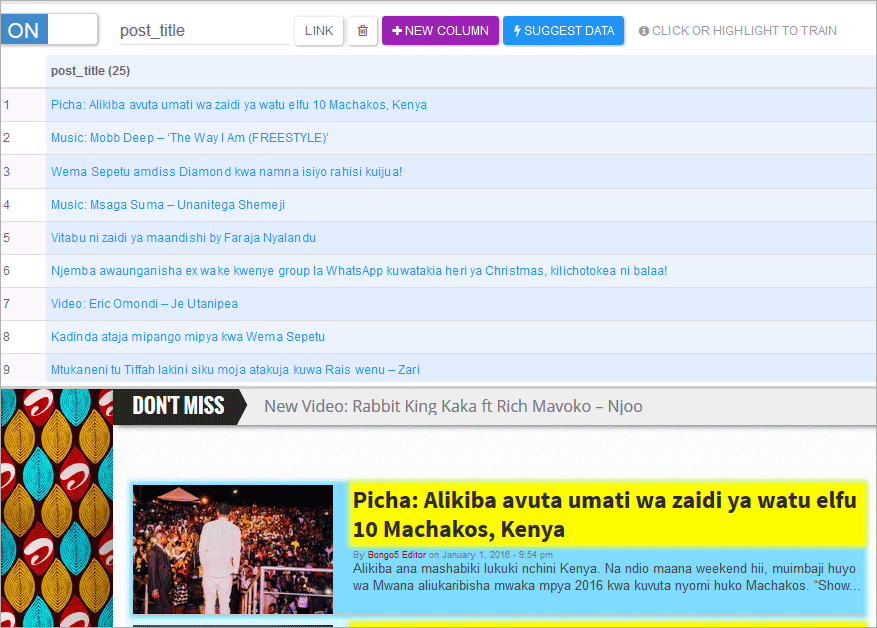
At the same time, the post titles will be extracted together with the posts URLs because I kept the option for the post title to be a “LINK”.You can specify by pressing the “LINK” button into something else if you wish.

Now add a new column and rename “my_column” to “author_name” and repeat the same procedures like in Step 4a but this time you should select the author name by the visual highlighter.

Select the author name by the visual highlighter as shown below.

After the two steps, you will end up with two columns as shown in the below window.The blog was having 25 posts per page and by the time of writing this post, it is having 834 pages, which by simple calculation is equivalent to 20,000 posts for the entire blog.
If you are going to extract the data for all the 20,000 posts you will need to create an API and then feed that API with 834 “page URLs” so that it can get data from all posts within those pages.

Creating page URLs is something we can not avoid.You can use excel to create a list of page URLs which you can reuse.Remember earlier I introduced the difference between a page and a post.So there are URLs for blog posts and blog pages.
Creating page URLs will be covered later after creating the API first.Now let us create our first API.
Step 5: Publishing the API
After previous steps are done and all the data we wanted were extracted successfully in a single page then now you need to turn that process into an API and you can use it anytime to extract data from the same blog or integrate it with other web apps.Remember the blog is having 834 pages but we extracted only a single page.Through the API, we can extract the rest of the data in few minutes.
After previous steps are complete press “DONE” as shown in the top right corner of the window below.

Give the name you desire to the API .I will name this tutorial API as Bongo5.com.

Once the API is published successfully you will end up with the following window.The API will be permanently created you can use it later also unless you modify or delete it.
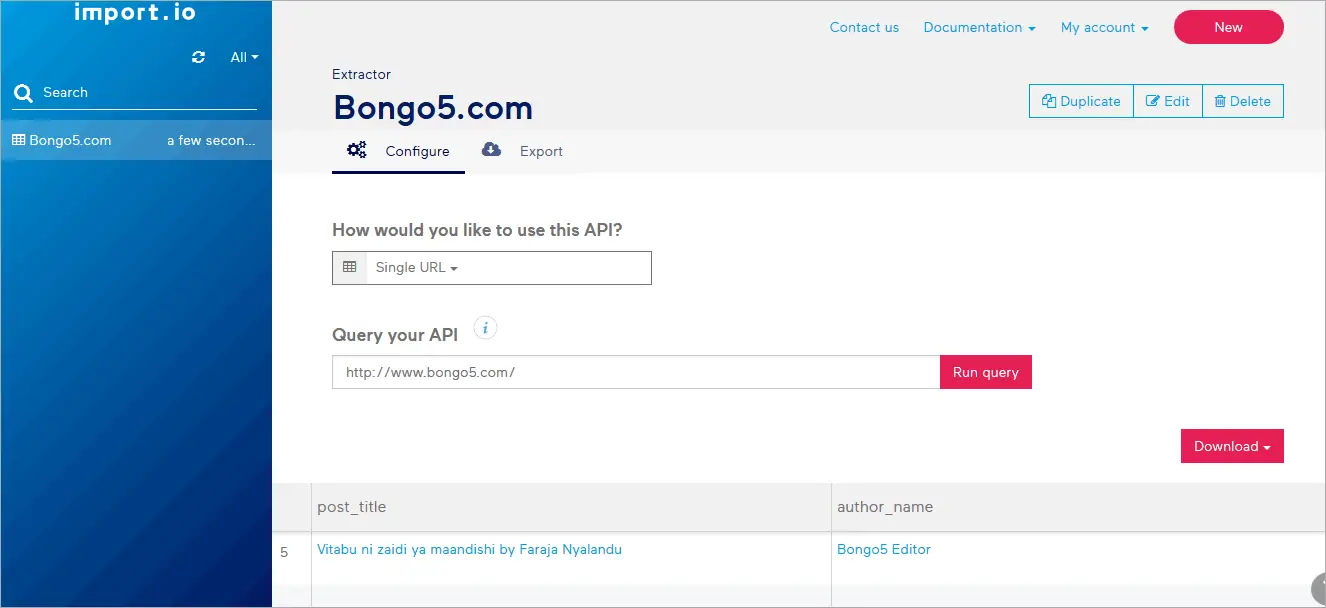
Step 6: Extracting data from multiple pages of the blog at once
I created the API for only one page of the blog, the blog has 834 pages and each page has 25 posts.Now I need to extract data from all the 834 pages.In this case, I expect to get more than 20,000 post titles and URLs.This will be done smoothly at once since we have the API.
I must create 834 page URLs manually by excel if you use formulas it won’t take much time.I created already the page URLs using excel.You can download the excel and modify it for your other purposes.As per my experience, most blogs don’t have many pages unless it is a very active blog or a news site.
Bongo5.com pagination follows the following pattern.So many page URLs have followed that pattern.Different blogs have different patterns.You need to check.But the majority of blogs follow a well-structured arrangement of posts, pages.
.
.
Once you are at the API window page select “Bulk extract” feature and paste all the 834 page URLs we created and select “Run Queries” and let the app do its magic to extract the data for us from the entire blog.
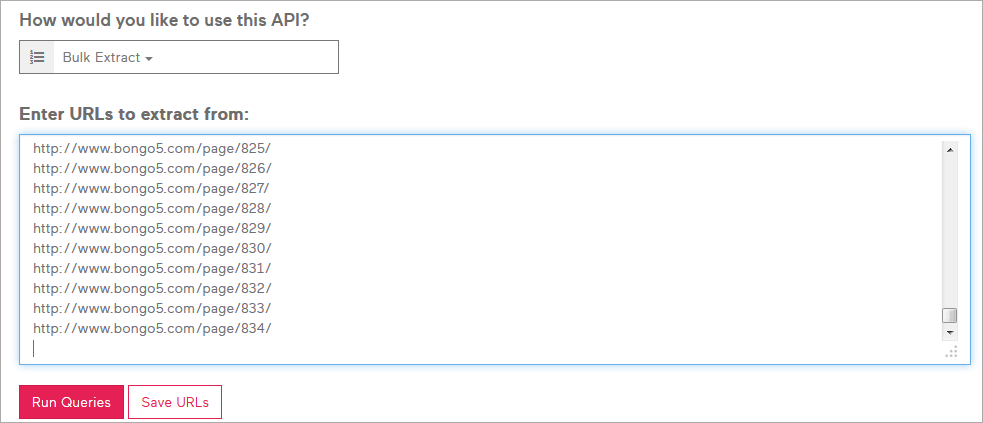
In less than 20 minutes I was able to extract 20,827 post titles and URLs from 834 pages.

Lastly, you can export the data as Spreadsheet or HTML or JSON.In this tutorial, I will export the data as spreadsheet/CSV.

After removing some redundant columns I ended up with a clean CSV file as shown in the window below.

Now after obtaining all the blog posts URLs posts titles and authors names.It is time to check which posts among the 20,827 posts received more social shares than others or which authors posts have performed well in terms of user engagement or which posts have received more engagement than others.
I will check each post-performance on Facebook, Twitter, Google, Pinterest, LinkedIn and stumbleUpon platforms.I will need to use another service or API to get those social stats.There are many providers out there but the one I have been using is sharedcount.com.
If you create a free plan account with sharedcount.com you are allowed up to a maximum of 10,000 bulk URLs requests per day for free to get social stats for the URLs.The majority of blogs have less than 1000 posts unless it is a news site or updated regularly.10,000 posts/URLs are more than enough per day.
Below is a snapshot of my sharedcount.com account.

After you created an account with sharedcount.com you can go ahead and bulk upload the URLs as you want.
As an example, I will pick 10 URLs from 20,827 URLs I have extracted but I can use as many up to a daily quota of 10,000 for a free account.
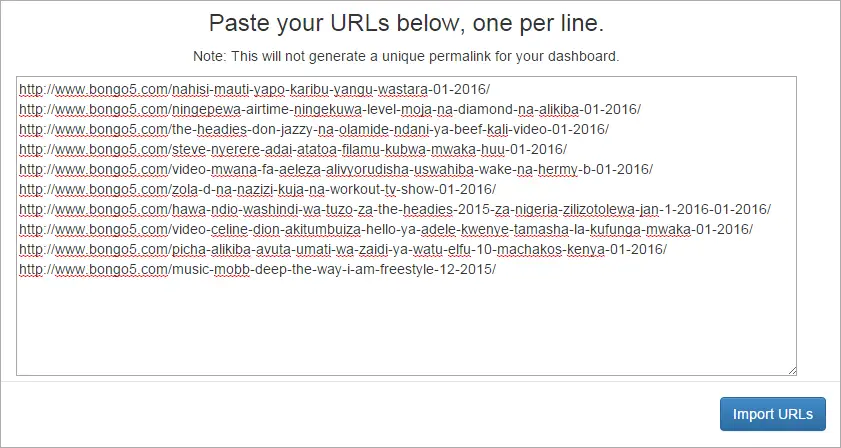
After importing the URLs you will get the below window on your browser showing different social media platforms their respective shares or likes.

There is an option to export them to CSV for later analysis.

After exporting to CSV that is what you will get.Data from Facebook, Twitter, Google, Pin interest, LinkedIn and stumbleUpon platforms showing how the posts are performing on those platforms.

Step 8: Combining the two excel sheets for further data analysis
Now the last step is to combine the two CSVs we obtained earlier into a single CSV for further data analysis.The final CSV has columns for Post URL, Author name, Post title and social stats.This is the goal we set for ourselves at the beginning.

Step 9: Data analysis
Once you have all the data now it is time to do data analysis.You can scrape any sort of data and do any sort of analysis depending on your requirements.This was just a simple tutorial to introduce you to the world of web scraping.
Anyways from the sample of 10 URLs, you can tell which post performed.There is one post having a total of 884 Facebook engagement which includes Facebook likes, shares and comments and the same post is leading in the number of likes and comments but it is the second position in the number of shares.
So if you have enough data you can compare and contrast and then draw a conclusion on what is working and what is not by observing user interaction with different content.
Conclusion
This visual step by step tutorial is a primer to the world of web scraping without coding using absolutely free tools without even hiring a data scientist.
Hopefully, it has been helpful to you.If you have any question or somewhere you didn’t quite understand please feel free to share your comments.

